
Hexagon Help
Out-of-date Versions | Troubleshooting | Registering | Using Hexagon | Administration
Hexagon requires Adobe Flash version 9 or greater, we always recommend updating to the latest version of Flash.
Out-of-date Hexagon versions
When you load Hexagon in a web browser, the latest version should load by default. However it will check to see whether it is an older out-of-date version that is not compatible with the latest release. If this is the case you will be directed to update to the current version.
Sometimes your computer can store an older version in its 'cache'. You may have to 'clear the cache' to allow the latest version of Hexagon to be downloaded.
One way to 'force reload' a page in some browsers, is to hold down a 'modifier' key while clicking the 'refresh' button on your browser (Shift, Alt or Control/Cmd). If this does not work you will have to clear your browser's cache.
For example with Internet Explorer:- for PC's you would go to Tools - Internet Options - General - Temporary Internet Files section - Delete Files button; for Mac's go to Preferences - Web Browser - Advanced - and press the 'Empty Now' button in the Cache section. This should force your browser to load the latest versions of all web pages the next time you visit them.
Trouble Shooting
Flash version: We recommend you install/update to the latest version of both Flash and your browser before you try Hexagon. At the very least you must have Flash Player 9. You can try this test application to check your current version.
If you need to update your Flash Player go to www.adobe.com.
Camera and Microphone: You can use Hexagon without any media 'input' devices to just 'view' the room. However, you should have a properly installed web cam and microphone to participate and get the most from Hexagon. Clearly, you won't be 'seen' unless you have a working camera, and won't be 'heard' unless you have a working microphone!
No picture?
a)Make sure that you have closed any other applications that use your camera!
b) Double check the settings: open the Flash settings panel by right clicking on Hexagon or using the button in Hexagon preferences, this allows you to change the standard Adobe Flash video, audio and other options.
c) Choose the camera tab from the Flash settings panel. Choose your camera from the drop-down list, the 'thumbnail' view should show the 'live' image from your camera. If not sometimes clicking on the thumbnail 'forces' it to appear. If it still does not appear your camera is not working with Flash applications.
No sound? When you speak, coloured 'bars' should appear on the audio 'ladder' that is situated on the right of the 'Voice Chat' pop-up window. These indicate the sound 'level' of your microphone. Ideally you should see the green bars when you speak.
If you need to adjust your sound use either the small button below the 'ladder', or the 'Open Microphone Settings' button from the main 'preferences' tab, to open the Flash audio settings and choose your microphone from the list there and set the volume using the slider.
If you still don't get any sound you may have to open your operating system's control panel and find the audio mixer controls and make sure that the volume level sliders are 'up' and also not 'muted' for microphone inputs. Of course Flash and FlashMeeting will only 'find' your microphone if it is already correctly installed and recognized by your operating system and you have a working microphone plugged in to the correct (and working) socket on your computer!
If you use the microphone in your web cam, this may still need to be selected from the list of audio devices in the Flash audio settings 'pop up' window, independently from choosing the web cam from the video settings 'pop up' window.
Firewall issues: Hexagon will automatically attempt to connect to your browser using one of the following 'ports': 443; HTTP 'tunneling' on port 80; 80; 1935. There may be a few seconds delay while it is doing this.
You will also need port 8080 open to register for a Hexagon room and when in Hexagon, to use the 'Reg Users' tab successfully.
The successful port is stored on your computer to make connecting to Hexagon quicker next time. If you need to delete the 'saved' port number (for example, if you connect the computer to a different ISP that uses a different port from the one stored), click on the 'Clear Stored Port' button in the Hexagon preferences window and Hexagon will automatically scan through the ports when you connect again.
Other issues:
Flash Player Settings Panel:
The Flash Player Settings Panel contains a number of useful settings and options. Open it either by 'right clicking' on Hexagon, or clicking the appropriate button on the Hexagon preferences screen under 'Media Settings Panel'.
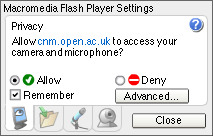 |
The 'Privacy' panel enables local access to your media input devices (mic, web cam), and this setting can be saved (click the 'remember' tick box) so that the 'warning' box doesn't come up each time you run Hexagon.
If the Flash settings panel appears when you first load Hexagon and you have to choose between 'Allow' or 'Deny', choose 'Allow' to enable both your sound and video. If this causes Flash to 'hang', restart the browser and choose 'deny' to use Hexagon in a limited way without your sound and video. This obviously means there is some video or sound 'set-up' problem between your system and Flash. |
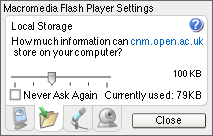 |
The 'Local Storage' panel allows you to set the amount of data Hexagon can store on your hard disk for a particular web domain. The default size is 100KB which should be fine for Hexagon.
If you find that your Hexagon preferences and settings are not being 'remembered' between sessions, check that the size is not set to zero KB. |
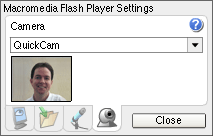 |
The 'Camera' panel allows you to choose your video input device from a drop-down menu. You may have to click on the small 'picture' rectangle to get an image to appear.
If you don't see an image here either you haven't chosen your camera correctly from the menu, or Flash can not find your camera software. |
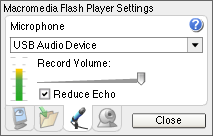 |
The 'Microphone' panel allows you to chose your audio input device from a drop-down menu and set the sound level. Adjust the level so that you see a 'green and yellow' bar when you speak.
|
Sound Problems: If you are having problems relating to sound, make sure you have a correctly installed sound card with the latest drivers. Also check in the Flash settings panel which sound device has been chosen if you have more than one source.
Do not place the microphone in front of your speakers as this will cause 'feedback'.
If you can't get any 'level' from your microphone you may have to open your operating system's 'audio mixer' panel and adjust the level sliders and 'mute' buttons so that your microphone's output is enabled.
Flash Auto Update: If you do not have Flash 9 it will automatically download and update. Unfortunately a dialogue box only appears after the download which may take a little while. If Hexagon does not appear straight away, wait to see if this is the case. If after a few minutes Hexagon has still not appeared and you are on a company network this may be because your machine does not have the correct administrative rights enabled. Use our version check page to find out what version of Flash you have.
Linux: Running Hexagon under Linux with video and audio can be difficult. Working video and audio are harder to achieve than other computer platforms (Windows PC and Mac). If you have Linux it is worth trying to see if it works with your particular setup. Check to see that you have the latest versions of relevant programs installed on your computer (especially Flash). The quality and compatibility of your web cam drivers can also be a factor as they are hard to find for Linux. We have had some success with the combination of a usb web cam for video and a separate microphone for sound plugged into the 'mic in' socket of the computer.
Performance Tip: Turn your own Hexes' video source to 'Remote View', using the button on the 'Hex menu' (or set it permanently as a preference), to save on processing. It is set to 'Local View' as default, this looks good but can slow down a computer by 10%-20% or more depending on the individual 'set up'. Be aware however that images on some Macs have a tendency to turn 'grey' when using this setting.
Browser Tip: Most browsers have a preference that you can set which will launch shortcuts into a new browser window. This will avoid the situation where you may inadvertently open a new web page into the window Hexagon is in, closing down its connection.
For example the path for Windows Explorer using XP is: Tools... Internet Options... Advanced... uncheck "Reuse windows for launching shortcuts".
Windows Explorer on a Mac OSX: Preferences... Interface extras... When another app asks IE to go to a page... check "Open a new browser window".
Safari on a Mac OSX: Preferences... General... Open links from applications in a new window".
Registering for Hexagon
Most users will need to register for the individual rooms they are interested in. However, some Hexagon 'rooms' can be entered for a limited time period as a 'guest' but with some of the room's features disabled.
Note: Once you have successfully completed the registration procedure when joining your first Hexagon room, you do not need to do so again if you wish to become a registered user of subsequent rooms. Because the 'system' already has your details, you just need to ask for registered access to the new room and await the confirmation email from the room's moderator.
A button labeled 'Register' appears on both the initial Hexagon 'Guest' and 'Login' screens. Clicking it will open a new browser window containing registration information. If you have never registered for any Hexagon room before choose the 'New Users' link, if you have registered for a Hexagon room previously choose a 'Registered Users' link.
New Users
Register and request access to... 'name of room'
Use this link if you have never registered for any Hexagon room before as you will be asked to complete a simple registration form. When you have completed the form submit it and you will see a web page confirming your registration request. Remember your email and password as they allow you 'registered access' to Hexagon in the future. Await an email to confirm that you have been accepted as a registered user of the room.
Registered Users
User Logon
You will need to enter your Hexagon registered email and password into the grey 'login' box that appears when you click on a link on the Registration page, before either of the pages listed below will appear.
Changing your password
You can also change your existing password using this 'login' box by clicking on the 'change password' button. Or, if you have forgotten your password, click on the 'email' button, and you will receive a new one via your email. You can then use this 'automatically created' password to 'login' to the system. If you wish you can subsequently change it to a password you prefer, in the same way as changing an existing password.
Request access to... 'name of room'
Use this link if you have registered for a different Hexagon room previously. You will see a web page confirming your registration request. Await an email to confirm that you have been accepted as a registered user of the new room.
Update my details
Use this link if you have previously registered for a Hexagon room and wish to check or change some of your details.
Guests
Guest entry
Some Hexagon rooms allow guest entry.
Guest restrictions
Guest users have the limitations listed below when compared to 'registered' users:
• Guests will have access to an individual Hexagon 'room' for a certain time period before having to reconnect (the time remaining is shown on the menu bar).
• The 'To All' button in the text chat window is disabled for Guests.
• Guests can not use the 'Load previous' button in the text chat window to see previous chat messages.
• Guests can not set the preference 'automatically reconnect' in the preferences window.
• Guests can not initiate a Voice Chat (except in the 'demo' room).
• Guests do not have access to the 'Reg Users' screen.
Using Hexagon
The Login Screen
Start Screen
If Hexagon is set up to automatically login a dialogue box appears confirming this, otherwise choose to either enter as a Guest or Login as a registered user.
Guest Entry Screen
• Type in your name and click Enter.
• Click Back to return to the start screen.
• Click Register if you would like to apply to become a registered user for a room in Hexagon.
Login Entry Screen
• Type in your screen name.
• Type in your user name (normally your email address).
• Type in your Hexagon password (only one is required for all Hexagon rooms your are registered for).
• Click Enter. If your details are correct you will have access to Hexagon.
• If you 'tick' the small 'remember' button, your screen name and user name will be saved. 'Untick' the button and your details will not be remembered.
• Click Back to return to the start screen.
• Click Register if you would like to change your user registration details.
Clear Stored Port button
• Most users will never need to use this button.
• When first run Hexagon will automatically choose and save a connection 'port' to use when it's run again. If you are having problems connecting (changing networks, Firewalls etc.) then press 'clear stored port'. The next time you run (or reload) Hexagon it will test for the best port again. This is the same as the button found in the preferences section to the right.
• Clicking the '?' button shows a helpful statement explaining the button.
Log Off
When you wish to leave Hexagon simply close the browser window. If you wish to leave Hexagon without closing the program, use the 'Log Off' Tab at the top.
General Notes
The Main Menu Bar
Use the buttons on the main menu bar at the top to navigate around the Hexagon interface.
The menu bar also contains an indicator that warns you if you have any unread text messages.
Moving the Main Window
Use the buttons on the 'Hexes' floating pallet to move or zoom the main window view. Click the 'reset' button on the right of the line of buttons to reset to the default view.
Click on the minimap or drag the minibox on the 'Hexes' floating pallet to move the main window view.
Floating Pallet
• You can drag the 'Floating Pallet' in the Hexes Window, to reposition it.
• Click and drag the pallet's title bar to move it, release the mouse when the pallet is in the desired position.
• You can click the 'minimize' button on the right of the title bar to quickly move the pallet to the bottom left of the window. Click again to see the pallet.
Hexes Screen
When you move Hexes around on this screen, they only change position for you, the changes you make are not reflected on other people's screens.
Individual Hex Floating Pallet
• Click on a hex to open its 'individual floating pallet', containing menu buttons, information about the owner, and current average activity levels for their sound (the more green bars shown the more active).
• Most of the menu buttons are self-explanatory. The 'Local View' or 'Remote View' video button, toggles between your hex showing images directly from your webcam (this has an impact on performance on slower machines), and still images returned from the server (you see the same image others see and get better performance).
Modifier Keys
• Ctrl+Click and drag to move a hex - (Cmd+Click for Macs).
• Alt+Click a hex to open the 'Text Chat window' and text chat to the owner, or your own hex to just view your chat.
Hex border colours key
• Black - your hex.
• Green - click hex to see text message.
Setting States and Screening your hex
• Click the 'States' button to open or close the States window. Click on the state you wish to set, click again to remove it. This appears on all remote instances of your hex on other people's machines. Use this to give people an idea of your general situation.
Registered users of a room can also click 'Custom...' to open a pop up box that allows them to add a short comment to the State icon on their Hex. When another person 'rolls over' the triangular icon (that appears when a comment is available) they will see the comment displayed over your Hex on their own copy of Hexagon. Click the 'save' button on the pop up if you want to keep the comments you write, otherwise they will be deleted when you quit.
Note: You can't set a state while you are in a Voice Chat.
• Click on the 'Screened' button to screen your hex for visual privacy. Click again to remove the screen. A screen appears over all remote instances of your hex on other people's machines. Use this to temporarily 'hide' your image from other people.
Fading Hexes
Pictures in a hex that don't update, fade to grey over time (approximately 5 minutes).
Text Chat Screen
• Click on a name from the list on the right of the 'Text Chat' screen to create a 'Tab' to that person. Alternatively it will select the person's tab if it already exists.
• Click on a 'Tab' that is not selected, to select that person ready to send them a message. Any text already sent to or received by that person, since the tab was created, will be displayed in the text area beneath the row of 'tabs'.
• Simply type into the 'input text field' at the base of the screen and click the 'Send' button to send a message.
• You can send URL's and email addresses. They will work from within the text chat.
• To delete a person's tab select it and click the small 'X' in the top right corner.
• If you send a message using the 'To All' tab, everyone in the room will receive it. Only registered users can create and use the 'To All' tab, although guests will see the messages. People entering a particular Hexagon room will not see any messages sent to the 'To All' tab prior to their arrival.
• When a small dot appears next to a name in the 'user list' it means that person is typing in the output text field (but not necessarily to you).
• You will see 'envelopes' traveling from one Hex to another, representing messages sent, unless you have chosen 'no' to this in the preference section.
• A person's tab will flash green if it is not the 'selected' tab and it contains an 'unread' message.
• If you don't have the text window open and you you receive a text message, the 'Text Chat' button on the main menu bar will flash. Clicking it will open the Text Chat window with the sender of the last message the 'target' for your reply.
• You can send a text message to a person who has a 'Do not disturb' state set but they will not hear the alert sound.
• If a person you have a tab for leaves, the tab will remain so that you don't lose any text and a message is displayed at the top of the tab indicating the departure.
Text Chat buttons
• The 'Send' button sends your chat message to the person who is the current 'target' for your message. You can also just press the Enter (or Return) key.
• The 'Show To All Tab' button creates or selects the 'To All' tab (not available to guests).
• The 'Delete this person's text' button deletes all the selected person's text on display.
• The 'Load previous' button loads the last text messages sent between yourself and another 'Registered user'. Type in another amount if you want to see a different number of messages returned. This only works for 'Registered Users' and doesn't work in the Hexagon 'demo' room.
• The 'Translucency' button toggles between an opaque and translucent text window.
• Tick or untick the 'Sound Alert' checkbox to choose whether the message alert plays when the chat window is open (this is the same as setting the preference).
Voice Chat
Voice Chat enables private voice communication between two people. None of the other people in the Hexagon room can hear your conversation. You can only be in one Voice Chat at a time. An icon appears on both of your Hexes in the main window, to indicate to others that you have a Voice Chat window open. Your Hex 'details' panel reveals to whom you are speaking if a connection has been made.
Inviting someone into a Voice Chat
• 'Guest' users can not 'open' a conversation (except when in the 'demo' room) but can accept an offer from a 'Registered' user of the room.
• Decide who you wish to speak to and click on their Hex to make the Hex popup menu appear. Click the Voice Chat button at the top.
• The 'Voice Chat' window, with a copy of both your Hex and the invited person's Hex, will appear in the centre of your Hexagon screen containing a button allowing you to cancel the invitation. The other person will see a similar window with a choice of buttons to either accept or decline the invitation. If they decline, their Voice Chat window will close and you will be informed of their decision. If they accept, a private connection will be made between the two of you, and you will then be able to speak to each other.
Using Voice Chat
• Only one person can speak at a time. You can easily see which of you is 'broadcasting' as that person's Hex has a green border. To speak you can either click the 'Speak' button; click your Hex in the Voice Chat window; or press and release the 'Page Down' key.
• When you want to stop broadcasting either click the 'Stop' button; click on your Hex in the Voice Chat window; or press and release the 'Page Down' key.
• If you are broadcasting you can click on the other person's Hex in the Voice Chat window to swap the broadcast to them. This may be a useful way of holding a conversation in some instances, as the other person will know you have finished speaking when their microphone 'goes live'.
• When you broadcast, a level meter to the right of the window, indicates the 'level' of your microphone output. You should sound fine if 'on average' it displays the green bars when you speak. Click on the small button beneath it to open the microphone settings panel if you need to choose or adjust your microphone.
Ending a Voice Chat
• Simply click on the small hexagon shaped button at the top right of the Voice Chat window to end the Voice Chat. The other person will see a message telling them you have left.
Reg Users Screen
• This screen is only accessible to registered users.
• It contains a list of registered users for the room and the last time they visited it. Click the 'refresh the list' button to update to the latest times. The list is sorted alphabetically but you can click the sort button to sort it by either ascending or descending time.
• Click on a person's name in the list to update their time, their last thumbnail image and target them for HexMail. An asterisk (*) appears at the end of the 'last refreshed' time to indicate you have updated an individual's time since last updating the entire list.
• HexMail, unlike the 'text chat' messages, can be sent to a person who is not currently in the room. They will receive it only when they next enter the room (click the 'check for HexMail' button if you think you may have been sent HexMail while you were in the room). You can also send a note or reminder to yourself using HexMail and see it the next time you enter the room.
• Use the 'Write Mail' and 'Read Mail' buttons to switch between writing and sending a HexaMail to someone, and reading HexMail messages sent to you.
• Use the 'Send' button to send a HexMail. This is only available if you have chosen a target person and have typed some text.
• Use the 'arrow' buttons to look though the HexMail messages you have received. They appear in date order, the latest message appears first. Click the 'delete message' button if you no longer want the message to appear in your HexMail 'box'.
• A graph showing the number of visitors in the room over time is also available. Click the buttons to view either one or seven days at a time. Use the navigate buttons to move back and forth through the days and weeks. When looking at the seven day view, click the 'date' number at the bottom of the graph to see that individual day's graph.
• If you click the 'T' button when you have a person selected in the list, the last text messages sent between you will be loaded into a new 'message history' window. Subsequently clicking on a person in the list, loads their last messages directly into the 'message history' window if it is already open. Type a new amount into the text box by the 'T' button, if you want to retrieve a different number of messages.
Preferences Screen
Use the preference choices and settings to the right of this screen to personalise your copy of Hexagon Virtual Office.
Media Settings Panel
Use the four buttons in this section to open the Flash settings panel to access controls and options for the video, sound and other Flash related settings.
General Preferences
• The amount of translucency of the text chat background
Choose how transparent you want the Text Chat background to be when you click the 'tint' button.
• Play the alert sound when a new text message is received
The alert that sounds when you receive a text message can be turned on or off. Note: it will not 'sound' by default if your state is set to 'Do not disturb'.
• Play the alert sound ('yes' above) if the text chat window is open
Choose 'no' if you don't want the message alert sound to play when you have the text window open.
• Choose the type of alert sound
Choose the type of alert sound you wish to hear.
• Enter Hexagon with your image already 'screened'?
Choose 'yes' if you wish your hex to appear 'screened' when Hexagon first loads.
• Show a confirmation box when you hit 'Enter' to send a message
Choose 'yes' if you wish to see a dialogue box appear confirming your action when you press the 'Enter' key to send a text message.
• Show 'Local' Video? (If no your camera is set to 'Remote' view)
If set to 'yes' your own hex shows video directly from your webcam. If set to 'no' it shows only your pictures, returned from the server, that others see. Note that choosing 'no' increases performance as it reduces processor load, but on some systems (usually Mac based) can increase the probability of the camera's image being 'lost' and turning 'grey'.
• Show the flying envelopes when a text message is sent?
If set to 'yes' you will see a 'representation' of the messages being sent between two people on the Hexes screen. Set to 'no' if you do not want to see this.
• Show confirmation box when requesting voice chat?
If set to 'yes' you will see a confirmation box before the connection is made for a voice chat.
• Try to automatically reconnect if disconnected?
For registered users only. Setting this to 'yes' will have Hexagon automatically reconnect if it is disconnected from the server.
Remote Video Delay
If your image appears black or has a strong colour cast when you have chosen to use the 'Remote Video' setting, you can adjust the delay between the camera turning on and the 'snapshot' being taken, to give your camera time to 'adjust'. With the slider to the left the delay is 1.5 seconds, fully to the right a delay of 5 seconds occurs. However, the longer the delay the greater the processor load.
Port Connection Information
When first run Hexagon will automatically choose and save a connection 'port' to use when it's run again. If you are having problems connecting (changing networks, Firewalls etc.) then press 'clear stored port'. The next time you run (or reload) Hexagon it will test for the best port again.
Administration
Hexagon rooms have people who are designated as 'moderators' or 'administrators'. Each Hexagon room is administered via secure web pages. To gain access to these you must be a moderator or administrator of the room.
Open the URL given to you when you become a moderator or administrator of a Hexagon room and type your email and normal Hexagon password into the 'login box' that appears. If accepted you see a page containing a list of rooms you have permission to administer. Click on the various links next to a room name to carry out the task you wish to perform.
'Logout' of the admin screens when you have finished.
Hexagon administration types -an individual can be one or more of the types below
• Moderator - sets the 'state' of users (i. e. 'active'); receives registration emails.
• User Admin - sets the 'state' of users (i. e. 'active'); can set a user to be a 'moderator'; does not receive registration emails.
• Room Admin - sets the 'properties' of the room (i.e. number of guests); does not receive registration emails.
• Super User - can see/set most things for any room; does not receive registration emails.
|